E12 | Paint Ceiling, Squeaky Floor | Ask This Old House
Season 24 Episode 12 | 23m 42sVideo has Closed Captions
How to paint a ceiling; comparing siding material; a DIY fix for a squeaky floor.
Mauro Henrique shows how to repaint a damaged ceiling and avoid tape mishaps. Heath Eastman, Ross Trethewey, and Kevin O'Connor discuss utility energy meters, comparing the old analog to the new digital and smart meters. Nathan Gilbert and Kevin compare vinyl, wood, and fiber-cement siding. Tom Silva demonstrates how to stop hardwood floor squeaks with a clever DIY fix.
Problems playing video? | Closed Captioning Feedback
Problems playing video? | Closed Captioning Feedback
Funding for Ask This Old House is provided by The Home Depot, Renewal By Andersen, and ChipDrop.
Support provided by:


E12 | Paint Ceiling, Squeaky Floor | Ask This Old House
Season 24 Episode 12 | 23m 42sVideo has Closed Captions
Mauro Henrique shows how to repaint a damaged ceiling and avoid tape mishaps. Heath Eastman, Ross Trethewey, and Kevin O'Connor discuss utility energy meters, comparing the old analog to the new digital and smart meters. Nathan Gilbert and Kevin compare vinyl, wood, and fiber-cement siding. Tom Silva demonstrates how to stop hardwood floor squeaks with a clever DIY fix.
Problems playing video? | Closed Captioning Feedback
How to Watch Ask This Old House
Ask This Old House is available to stream on pbs.org and the free PBS App, available on iPhone, Apple TV, Android TV, Android smartphones, Amazon Fire TV, Amazon Fire Tablet, Roku, Samsung Smart TV, and Vizio.
Keep Exploring


This Old House Insider Newsletter
Get This Old House exclusive stories, tips, and behind-the-scenes information delivered right to your inbox every month.Providing Support for PBS.org
Learn Moreabout PBS online sponsorship♪♪ Kevin: On "Ask This Old House," our experts travel across the country to answer questions about your house.
♪♪ Today, Mauro teaches a homeowner how to paint their ceiling.
Mauro: And you're going to get really close to the crown.
Now you go back and you spread the paint.
Kevin: Then Nathan discusses the options available in home siding.
And do your floors squeak?
Tom: Boy, that floor has a lot to say there, doesn't it?
Kevin: Tommy helps a homeowner make his floors nice and quiet.
All that on "Ask This Old House."
♪♪ Mauro: Hello.
Melissa: Hi, Mauro.
Welcome.
Mauro: Nice to meet you, Melissa.
Melissa: Nice to meet you.
Come on in.
Mauro: Nice house.
Look at this.
Melissa: Thank you.
This is our little home.
We've been working really hard to finish the kitchen over the last year, so we've renovated all of this.
Mauro: It looks pretty good.
Melissa: Yeah.
Thank you.
Mauro: Paint job here looks nice.
That's the first thing I always look at.
And then now we're focused on finishing up our living room.
Mauro: All right, so what are we doing here in this room?
Melissa: So we're trying to finish the ceiling.
When we painted the walls we put tape up to do the molding.
And when we peeled it off, we took away, like, a lot of the old paint.
So it's all chipped in the corners now.
Mauro: You didn't paint the ceiling.
Melissa: We did not paint the ceiling.
Mauro: Came already done.
Melissa: Yes.
Mauro: All right.
And then when you pulled the tape off, some of the paint came right up.
Melissa: That's right.
Mauro: We can fix that.
All right, so do we have a color for this ceiling already?
Melissa: I'm thinking just like white.
Nice and clean.
Bright.
Mauro: That's a good idea because you're going to brighten up this place a lot.
Melissa: Yeah.
Mauro: All right.
So are you ready?
Melissa: I'm ready.
Mauro: I'm gonna step out, get some materials, what we need, and we're going to work.
Melissa: Okay, that sounds good.
Thank you.
Mauro: Okay, Melissa, before paint, preparation has to be done.
And one part of the preparation is for us to remove as much of this furniture to the next room.
Melissa: Okay.
Mauro: Well, couch is protect, floor's protect.
And I like to find out what's up there.
So I want to pull this light down and let's find out what we have.
Whoa, whoa.
Well, what we have here is like this blown-in insulation that makes a huge dust when you open this.
Melissa: Yeah.
Yep/ Mauro: Pull the lights down.
And in this case, we're going to put this light back.
We're going to have to cut around with the brush.
Nice and easy just like that.
Melissa: Okay.
Mauro: And then we'll roll the field.
Melissa: Great.
Mauro: But before we do that, we have to protect all the walls.
Melissa: So what kind of tape are we using?
Mauro: We're using what we call painter's tape.
It comes in different colors and different thickness.
So this one here is like a medium adhesion.
It can go on the surface really well.
But you have a limit time that you can keep the tape on the surface.
Okay?
And then you have to pull the tape up.
Probably this is what happens over there.
Wrong kind of tape or you wait too long to pull it up.
Melissa: Yeah.
When we moved in, we left it on there.
And so I bet you we just left it on too long.
Yeah.
Mauro: Now you know, you have time to put on, and then you have to respect the limit of time for you to take it off.
Remove the tape.
Melissa: Got it.
Mauro: All right, let's go to work.
Melissa: All right.
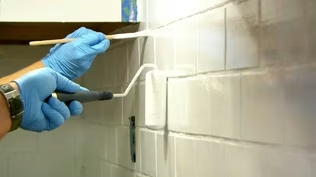
Mauro: Time for you and I to do our cutting lines.
Okay?
What I like on a cutting line on the ceiling, I like the angle brush.
Melissa: Okay.
Mauro: Because I can see everything that I'm doing because that angle there.
And you're going to get really close to the crown.
But really with this tip here.
Melissa: Okay.
Mauro: And then you spread the paint.
Melissa: And we don't need to use primer or anything before we do this?
Mauro: Well, if you have like a raw plaster, never painted before, then you use a primer.
Melissa: Got it.
Mauro: Okay.
And another situation, when you have glossy paint and you want to turn it into a flat finish, then you put a coat of primer on it.
Melissa: Okay.
All right.
Mauro: But other than that, this has been done with a flat interior paint, so we're good to go with the white on top.
Melissa: Got it.
Okay, cool.
Mauro: Okay?
So here's where we go.
You go like this.
Melissa: Okay.
And use the front tip.
Mauro: Yes.
And then you drag around and you spread the paint just like that.
You want to give it a try?
Melissa: Sure.
I'll try it.
Mauro: Here we go.
Melissa: How much paint do I put on the brush?
Mauro: Just enough.
Just don't dip too much.
Yes, nice and easy.
Go really close.
Don't need to go fast.
Just nice and easy.
Yeah.
Now you go back and you spread the paint.
Melissa: Do we have to use ceiling paint in specific, or can I use wall paint as well?
Mauro: You can use whatever you want.
It's about preference.
Sometimes you have like the wall which is the most popular finish is eggshell.
They want to see eggshell on the ceiling.
But I like the flat because the flat doesn't attract so much light.
Melissa: Got it.
Mauro: I don't see any paint on your hands or on yourself.
Melissa: Pretty good.
Mauro: That's a pro.
Melissa: Would I get an A?
Mauro: You got an A plus.
Well, when you're painting, there's three important things for you to know about.
So, number one, the correct amount of paint on your brush.
Number two, speed.
Number three, consistency throughout.
Then the paint job will fly.
When it's time to roll, right, same thing again.
The three steps are?
Melissa: How much paint is on your roller.
Speed.
Consistency.
Mauro: Beautiful.
Great job.
And it goes just like that.
Not a lot of pressure.
Just enough to release the paint from the roller.
Melissa: I see that you're holding it at an angle.
Am I supposed to do that or do I just go straight up?
Mauro: Well, number one, you don't want your roller to be right on top of your face like that.
Melissa: That's usually how I do it.
Mauro: Because you're going to paint not only the ceiling, but yourself also.
Right?
You're going to have it an angle like this so you can see better what you are doing.
Melissa: Okay.
Mauro: Want to give it a try?
Melissa: All right.
I'll do my best.
Mauro: All right.
All right.
♪♪ Melissa: This is quite the arm workout.
Mauro: Oh, it is.
Who needs a gym?
♪♪ First coat is done.
Let's let it dry.
We'll come back and we put the second and final coat on.
It is the same process as we did before.
Cut in the edges and then we can use the roller.
♪♪ ♪♪ Melissa: What do you think?
Mauro: Look at the ceiling.
Melissa: Looks so much better.
Mauro: Better.
Brighter.
Melissa: Yeah.
The room actually looks finished finally.
Mauro: And even the walls looks much better now with that ceiling color.
Melissa: Complete.
Mauro: Well, we did it, so it looks great.
Now you know how to do it.
And I know you have more ceilings to do around your house, but if you just need some help, let me know.
Melissa: Of course.
Thank you so much.
I really appreciate your help.
Mauro: Thank you.
♪♪ Kevin: Oh, look at you guys with your meters.
Are you serving coffee with this conversation?
Heath: We can if you want some.
Kevin: What am I looking at?
Heath: So you're looking at kind of the history of electric utility meters that we'll see on homes that we have.
So one of the first ones that we used to see was the analog meter.
This glass case.
Mechanical.
Ross: Yeah.
Mechanical.
You see the rotating dial in there, right?
And you look at it, the more power you used, the faster that spun.
You would clock up.
You know, you'd see it, and then someone would have to walk by your house for the utility company, write down the meter number, write down the total amount of kilowatt hours you used, subtract it from what you used the previous month, and send you a bill, right?
So that was the old-school analog style.
Kevin: Analog indeed.
This guy?
Heath: Digital.
So there's a push to go on to these.
And most of us probably have the digital versions now.
The nice thing about this, it's a little more accurate, but it also has the ability to have one-way communication, meaning they can remotely read the meter.
Ross: Nobody walking by.
Heath: Nobody has to walk by.
You can drive by or it can go back to the utility.
Kevin: So then what's that?
Heath: So that is Smart Meter 1.0.
These offer a little more information.
They start to monitor your energy usage.
These have the ability for two-way communication.
And the thing for the two-way is you have the ability to remotely shut those off.
So if you have an issue at a house, you have first responders coming, you have a gas leak, a fire going on, the utility company can know before anyone arrives, disconnect the power.
Kevin: So the house is sending information to the utility one way, but the utility is sending direction back.
That's the second one.
Heath: Correct.
Ross: That's right.
And this is going to happen every 15 minutes.
So it's going to ship that data every 15 minutes so they know what's going on, but it's not true real-time.
What's coming though is Smart Meter 2.0.
So the next version of this will be real-time.
So we're talking about a lot of data, high resolution, instantaneously.
So they can see exactly at any moment.
If you lose power in that house, they know.
If there's an outage in that area, they can see exactly which houses are affected.
So it gives them a lot more granularity.
The other part of it for the consumer is that they're allowed to log in from their computer and see how much energy they're using real-time.
Kevin: See how excited he gets with that?
Wants to log in.
Heath: Well, you get to use an actual app versus seeing the dial spin.
Ross: It gives you data, right?
And then you can affect energy behavior and hopefully reduce the load on that house.
Heath: He loves this.
Kevin: He does.
You know what, I do now too.
Thank you for the information.
I don't even need coffee to get through this conversation.
It's actually pretty interesting.
♪♪ Hey, Nathan.
Nathan: Hey, Kevin.
How's it going?
Kevin: It's going all right.
Looks like we got some siding discussion going on.
Nathan: I'm getting a lot of phone calls about siding jobs right now.
Kevin: Better you than me.
Nathan: Yeah, I know, I know, I love doing it.
It's a good job.
But people always have questions.
Kevin: I presume they're asking you what should they use and what's the best for them?
Nathan: And it all is driven off of their budget, of course, but I want to go over some of the most basic ones, especially the ones we see here in New England.
Start with the most cost- effective one is vinyl siding.
It's a good product.
This is a double four here.
Nice white color.
Kevin: Double four meaning you're going to get...?
Nathan: Four-inch exposure, four-inch exposure.
So you're running two courses at one time.
So it goes up nice and quick.
Kevin: Okay.
And people love it.
They can go over their old siding with it, which we see a ton.
Nathan: Yeah.
You're going to see this a lot on new construction jobs.
You're going to see it a lot on siding remodels.
Again, easy to put in, easy to maintain, just a good product.
I actually like the way it snaps in.
You know, you get a nice tight joint right there.
Kevin: So your installation is going to go quickly.
And from the homeowner's perspective, satisfaction is going to be instant and they're never going to repaint that.
Nathan: No, no.
Pressure wash it once a year and you're good.
What I like, too, about vinyl siding is if they're replacing a window or a door, I can go unzip everything, do the job, and then just zip it back up.
Kevin: We see it everywhere, although not our first choice for historic homes.
But a cost-effective option.
Nathan: Very good.
Kevin: We are very partial to wood.
Nathan: And I am too.
Cedar is my favorite material to work with.
I like cedar shingles.
I like cedar clapboards.
They have a timeless look.
You see them on a lot of houses in the area.
Kevin: These ones have got primers on them and, you know, natural material, tapered, which is key for you.
Nathan: So I can adjust my coursing, I can adjust my exposure.
So I can take my cedar clapboards here, traditionally it's going to be a four-inch exposure.
Kevin: Which is the exposure being this dimension.
Nathan: The face to the weather.
And then as I get close to maybe the top of a door or window, I can adjust this ever so slightly to hit the top to keep that clean line.
Kevin: So that is not something that you can do, for example, with vinyl, whereas you can make the coursing like that.
You get what you get with the vinyl.
Nathan: Exactly.
Once you set your first course down below, that's driven all the way up the wall.
Kevin: In terms of cost, you got a sense of the difference between vinyl and wood?
Nathan: Wood's going to be the most expensive right now, and then vinyl is going to be the cheapest.
Kevin: Okay.
And then in terms of maintenance, as I said, never going to repaint that.
How frequently are you going to repaint this?
Nathan: Let's say every 7 to 10 years, you know, and it may be some sanding too.
So there's a little bit more maintenance with that.
Kevin: Okay.
So probably in the middle.
Nathan: Yeah.
In the middle, we're going to go with fiber cement siding.
You can get it primed.
You can get it painted with a finish coat.
We have a cedar mill face here and a smooth face.
Kevin: Okay.
Nathan: You can even get it for different exposures we were talking about.
So here, this is a four-inch.
So we have a nice four-inch exposure.
Here we have a seven-inch exposure.
This one's raw.
No primer or paint on it.
Kevin: This is a man-made material.
Nathan: Man-made.
Kevin: The name pretty much tells us all we need to know -- Fiber cement.
It's a cementitious material.
Nathan: Yep.
Cement, sand, and wood pulp.
Kevin: Really?
In this?
Nathan: Yeah.
Wood pulp.
Yeah.
Kevin: Huh.
Well, despite the fact that it might have some wood pulp, it really stands up.
Nathan: It is rot resistant.
It is pest resistant.
It's a really good product.
Kevin: And if you're going to have to repaint cedar -- Well, vinyl never, cedar say every seven years.
How frequently do you have to repaint this?
Nathan: 10 to 15 years.
Kevin: So that's a big bonus.
Nathan: Yeah.
Yeah, definitely.
Kevin: Do you enjoy working with it?
Nathan: I don't mind it.
I like snapping it.
I get a nice clean cut.
You don't get as much adjustability with your exposure to hit your tops of your doors and windows.
So this one is set up for four inches.
Four inches, you're good.
If you try and shrink it a little bit, you get a little bit more rock.
So as you crawl up your sidewall, as you look up, you would see a little bit of a shadow line there, which you don't really want to see.
Kevin: So less adjustment there.
Maybe choose a different fiber cement product if you want different exposures.
Nathan: Or you have to think way ahead.
You need to be pulling measurements to the tops of your doors and windows, making sure you're running your courses perfectly to hit.
Kevin: And in terms of cost, where does it fall?
Nathan: I would say it's right in the middle.
I would say most expensive, right in the middle.
Vinyl is going to be your cheapest.
But then even within each type of siding, there's, you know, more expensive options.
Kevin: Good.
Well, it's nice to see the options here in front of us.
Thank you.
Nathan: Good.
♪♪ Anthony: Hey, Tommy.
Tom: Hey, Anthony.
How are you?
Anthony: Thanks for coming.
Tom: Oh, my pleasure.
Wow.
Looks like you've done some work in here.
Anthony: Yeah.
Tom: New kitchen.
Anthony: Extensive renovations last year.
Tom: Very nice.
Anthony: This was my grandparents' house.
Tom: Oh, really?
Anthony: My wife and I bought it last year.
We have a 2 1/2-year-old son and moved in.
Tom: How long did your grandparents own it?
Anthony: Over 70 years.
So.
Tom: Wow.
Anthony: Yeah, it's been in the family.
And we're lucky to have another generation come through.
Tom: Well, it's a keeper.
Anthony: Absolutely.
Tom: It really looks good.
But what did you call me for?
Anthony: Oh, we got one persistent problem upstairs.
Tom: Upstairs?
Anthony: Yep.
Tom: All right, well, lead the way.
Let's see what's going on.
There's always something.
Yeah.
The stairway is really nice.
I like the metal balusters and the flat handrail.
Kind of contemporized it.
Anthony: Thank you.
Yeah, we replaced the treads, and then we pulled up the carpet because we loved the flooring underneath.
Tom: Yeah.
It's beautiful.
Anthony: Yeah, it's existing to the house.
And then this is my son's bedroom here.
Tom: Oh, it's nice and bright.
Anthony: And we run into some issues when we're putting him to bed at night with this floor right outside of his door.
Tom: Boy, that floor has a lot to say there, doesn't it?
Anthony: Yeah.
It's very hard to be discreet.
Tom: Yeah, I can see right there that somebody tried to tighten it up by nailing it right down through.
Well, I made a mock up, and I brought it with me.
And I can show you exactly what's going on with the floor system and the structure below.
Anthony: Awesome.
Tom: Let's take a look.
It's downstairs.
All right, Anthony, this represents your floor system so you can understand what's down below the floor.
Start off with the finished floor, a subfloor, and the structure.
The subfloor would be nailed to the structure with a nail like that.
And what happens is your house expands and contracts all the time with humidity and dryness.
In some cases, if the nail isn't into the structure nice and tight, or if there's a void or a knot or something like that, when the structure expands, it gets bigger and it can actually pull the nail up as the board is swelling, and then when it dries, the nail is left up ever so slightly.
Now you have something that's loose right here.
And when you step on it, this structure and the subfloor is squeaking on the nail itself.
So what we need to do is we need to tighten all these up.
Like they took the nails upstairs and they drove nails down through the finished floor, through the subfloor, into the structure, and put it down ever so slightly, bringing the sandwich all down and make it nice and tight.
Anthony: Okay.
Tom: Okay.
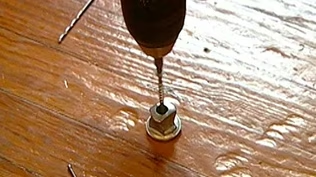
But we don't want to see the heads of the nail, but they actually make a kit that has this attachment here and a special screw that goes through the attachment like that.
And you drive the screw and it goes through both pieces with this tight to the top of the finished floor, goes through the finished floor, through the subfloor into the structure, pulling all of this sandwich down nice and tight.
All right.
So now if you look at the screw and I take it out of the attachment right here, you can see the smooth part of the shank.
And where the thread begins, there's a little line that goes all the way around the screw right there.
And that is designed so the torque of the drill driver snaps the head off and you'll end up with two pieces.
And the screw has broken off right below the finish of the floor.
And the floor won't squeak anymore.
Anthony: And we'll never see it.
Tom: That's right.
First thing we need to do is find a joist down below.
And the joist should -- If these nails are into the structure right here, that helps us.
Unfortunately, I don't think the house is framed 16 on center.
It's probably random framed.
So if I just lay my tape measure out like that and I say, well, okay, there should be a joist here, another one over here, well, I know there's got to be one there by this wall, but let's say if I take and I try to find it by sound, that sounds a little hollow right there.
So I'm looking for a sound change or a more solid sound, let's put it that way.
Hear the change in the sound?
Anthony: Yeah.
Right at the 24" mark.
Tom: 24" mark.
Let's try one right there.
So what I'll do is I'll take this bit with a very small amount of thread on it and a smooth shaft.
So when I drill through the floor with this part of it, I get through the floor into the subfloor.
If there's no structure underneath, I should be able to push this right down.
If there's structure underneath, it will pull the drill down with it.
So we'll give it a try.
Let's try.
I'm going to try on the 24" number.
So let's see what happens.
No structure there.
And nothing there.
All right.
So I'm going to try right here.
Oh, there's one right there.
So that thread is into the joist.
I can feel it pulling down.
If I put the drill in reverse and I try to hold the drill down, if there's no structure there, I will be able to hold the drill.
If there is structure there, the thread will push me out.
So it pushed me out a little bit.
So there is structure there.
So let's put a little piece of blue tape right there.
Shows where the joist is.
Now if I take a measurement, let's go from the edge of the floor in here over 12 inches.
12 inches here.
12 inches, that lines up with that.
So what I'm going to do is we'll try and drill a screw and see if it grabs.
Anthony: Is there anything we want to listen for or you'll feel it?
Tom: Well, you'll actually hear it.
You should hear it snap or pop.
Anthony: Okay.
Tom: And if I do it right and it grabs into enough structure, it'll snap right below the finished level of the floor.
All right.
Why don't you stand on the board right there?
Push everything down tight.
Ready?
Anthony: Yep.
Tom: Didn't snap.
Okay, let me try one more right here beside it.
This old framing structure could be a little bit too soft.
Anthony: There it is.
Tom: Okay, so we're into structure right there.
Let's try one more right here.
I'll just push down and pull the trigger full blast.
There you go.
Anthony: There we go.
Tom: Pull it up.
All right, now, let's try stepping on that again.
Anthony: Okay.
Tom: All right, let's try one more right beside that one.
Full blast.
Boom!
All right, so walk in from the hall.
Anthony: Okay.
Tom: That's pretty quiet.
Now walk out.
Anthony: So much better.
So much better.
Tom: Yeah.
Anthony: Yeah.
Tom: So it doesn't sound too good or it sounds good?
Anthony: The lack of sound is good.
Tom: All right, so now what we got to do is we got to fill the holes.
Anthony: Okay.
Tom: So we get some wax sticks, three different colors.
You see there's different tones in the floor.
So you just pick one and go back and forth.
Work it into the hole to fill it up.
We're not going to match it exact, but we want to try to blend it.
So blend the colors together, a little bit of this, a little bit of that.
Keep working it in, working it around.
Come back to this one.
Go back to this one.
Buff it.
Looks pretty good.
Anthony: Blends right in.
Tom: Yep.
All right.
Let's see how it looks now that it's all cleaned up.
Whoa.
I think it looks pretty good.
Anthony: Can't even tell we were up here drilling holes.
Let's give it a little test.
Oh, wow.
What a difference.
That's so much better.
Tom: Well, hopefully all you hear is your son snoring.
Anthony: Thank you so much for coming, Tommy.
Tom: My pleasure.
So if you've got questions about your house, we'd love to hear from you.
Until then, I'm Tom Silva for "Ask This Old House."
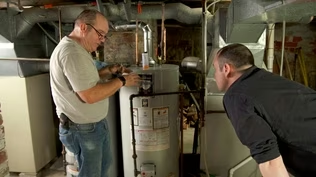
♪♪ Kevin: Next time on "Ask This Old House," Ross discusses the advancements in water tank technology and works with a homeowner to install a solar thermal unit.
Then, do you have problems with houseplant pests?
Jenn gives advice on how to get rid of them.
And Nathan helps a homeowner get better access to their attic by installing pull-down stairs.
All that on "Ask This Old House."


- Home and How To

Hit the road in a classic car for a tour through Great Britain with two antiques experts.


Support for PBS provided by:
Funding for Ask This Old House is provided by The Home Depot, Renewal By Andersen, and ChipDrop.